BenQ (ZOWIE) XL2540

Specifications
| Brand: | BenQ (ZOWIE) |
|---|---|
| Model: | XL2540 |
| Size: | 24.5" |
| Resolution: | 1920x1080 |
| Panel type: | TN |
| Max. refresh rate: | 240 Hz |
| Panel: | AUO M250HTN01.0 |
| Processor: | REALTEK 2796BF |
| Backlight type: | LED (white, edge) |
| Price (approx.): | USD 500 |
| Monitor release date: | 2016-11 |
| This review's date: | 2017-02 |
Reviews
BenQ XL2540 review on RTINGS.com.
AOC AGON AG251FZ and Asus ROG Swift PG258Q on TFT CENTRAL (obviously not the BenQ XL2540, but the same (AOC) or similar panel (Asus)).
At a glance
This monitor is one of the first LCDs that supports a maximum refresh rate of 240 Hz out of the box. However, this monitor neither supports G-Sync or FreeSync (but see below) nor does it provide any option for reducing motion blur (strobed backlight) – at least not "officially", as motion blur reduction can be easily activated and customized via the monitor's service menu (see below). The image quality and viewing angles are TN-like bad but not as bad as many of the 144 Hz full-HD monitors, although also this monitor uses just a 6bit+FRC panel rather than a true 8bit panel. Moreover and quite surprisingly, there is no obvious deterioration in image quality when using 240 Hz instead of, say, 120 Hz. This might be due to an improved color management which appears to be similar if not identical to the BenQ XL2730Z's color management (both using basically the same REALTEK scaler).
Unfortunately, this monitor leaves quite some room for improvement:
- The overdrive (in BenQ-terminology: AMA) is way too aggressive – as is standard for BenQ gaming monitors, unfortunately –, and BenQ still refuses to provide the user with a better overdrive control.
- Officially, motion blur reduction is not made available, although it seems to be fully implemented and functional. One might argue that strobing the backlight at 240 Hz would create more artifacts than it would do any good, especially given that motion blur is small anyway at such high refresh rates. But even if this was true, users might want to use this monitor also at lower refresh rates, for example when playing games with too complex scenes to be rendered fast enough.
- Having a refresh rate as high as 240 Hz might seem as a commercial gimmick but it is not, for quite a number of reasons:
- Input lag is reduced for obvious reasons.
- Pixel persistence is reduced because pixels are "recharged" more often.
- Overdrive can be more aggressive because it is applied for a shorter time. Unfortunately, it also has to be more aggressive to have an effect, for the same reason.
- Motion clarity is improved even without using special motion blur reduction techniques.
- Dithering and pixel inversion artifacts become less obvious as more of the "bad" frequencies fall beyond the flicker-fusion frequency. BTW, pixel inversion artifacts result in vertical line patterns on this monitor.
- Although most of these positive effects would even apply if the PC provided a lower refresh rate (e.g. 120 Hz) and the refresh rate would be up-scaled to a higher monitor refresh rate (e.g. 240 Hz), no such temporal up-scaling is implemented.
- When it comes to motion blur reduction via strobed backlight at a relatively low input refresh rate, such as 120 Hz (where it is also more needed than at 240 Hz), internal refresh rate up-scaling would be especially beneficial as the faster pixel update would leave more time for the pixels to settle before the backlight strobe. Moreover, pixel settling can be boosted by more aggressive overdrive and by "recharging" the pixels more often, as mentionned above, all of which would help reducing cross-talk considerably. See the EIZO FORIS FG2421 for a monitor which implements such up-scaling in its TURBO240 mode.


Good to know
Have the monitor connected to a valid signal source. The service menu can be entered by keeping the 4th button from the left pushed while powering the monitor on. Once the monitor is up and running, the 4th button can be used for toggling the service menu on and off. For accessing the normal OSD menu again, power-cycle the monitor. (The old trick of just making the service menu disappear, then pushing any other button except the 4th so that the OSD icons appears, then pushing the 4th button again to enter the OSD, does not work here.)
The factory menu can be brought up by keeping the 3rd and 4th button pushed while powering the monitor on. The 5th button can then be used for toggling the factory menu on and off. In this mode, the OSD menu is available as usual, apparently with no timeout for switching it off automatically (quite useful during monitor testing, actually). To go back to normal, power-cycle the monitor. The monitor does not respond to VCP commands sent over DDC/CI when in factory mode.
Firmware
The firmware in this monitor cannot be updated as easily anymore as it used to be with previous BenQ gaming monitors. This is because of the different scaler being used (REALTEK instead of MSTAR). Even with the older BenQ gaming monitors it was a hassle to get the firmware updated without sending the monitor in. But given that the firmware becomes more and more the bottleneck and that updating is technically possible even without additional hardware, it is about time that manufacturers provide the users with tools so they can easily do the updating themselves – which has become common standard with other devices by now for long.
Signal inputs
This monitor provides DP (Display Port), HDMI, and DVI-DL (dual link). When using the HDMI input, the BenQ expects the color value range received from the PC to be reduced ("RGB(16~235)"). If the PC uses the full color range instead (which is normally the case), then HDMI range should be set to "RGB(0..255)", because otherwise dark and bright colors will be crushed.
Technically, the full 240 Hz can be used with all three input types, but 240 Hz is not necessarily made available by the operating system. However, this can be changed quite easily with ToastyX's pixel clock patchers and CRU.
Contrast setting
When using Picture Mode=Standard with the default Contrast setting of 50% and looking at Lagom's White saturation test pattern, the grey/white fields might actually appear reversed for some of the brighter grays (so the gray fields appear brighter than the white fields). This effect is also quite susceptible to the viewing angle (looking at it from above – normal working distance, eyes at the height of the upper edge of the screen –, versus looking at it from a straight angle) and also depends on the white balance setting (which basically is a color-specific Contrast setting). With a Contrast setting of 45% this effect is basically gone.
Somewhat reducing the Contrast setting to 45% or even 40% has also a positive effect on balancing the pixel settling times, thereby minimizing color shifts at the edges of moved objects.
Features
Motion Blur Reduction (MBR)
Motion Blur Reduction (MBR for short) is BenQ's alternative to 2D LightBoost and NVIDIA's Ultra Low Motion Blur (ULMB) which comes with G-SYNC monitors (although ULMB can only be enabled while G-SYNC is disabled).
Like LightBoost, MBR strobes the backlight once per refresh interval. In contrast to LightBoost and ULMB, however, MBR neither uses a special LC panel update timing nor does it adapt overdrive parameters according to the vertical pixel position; this makes MBR potentially inferior to Lightboost and ULMB.
As mentionned earlier already, MBR is not available through the standard OSD menu but can only be activated and customized through the service menu or through the DDC control interface (VCP code 40h: Blur reduction on/off, 41h: Intensity, 42h: Area). MBR works with 100 Hz up to 240 Hz but not with 60 Hz or below.
The Intensity setting controls the width of the backlight strobe and ranges from values 25 (short pulse = dark) to 1 (long pulse = bright). These values translate to pulse widths from 0.1 ms to 2.1 ms for 120 Hz, and from 0.04 ms to 1.04 ms for 240 Hz.
The Brightness setting in the standard OSD controls the brightness by modulating the LED current. In order to partially compensate for the LEDs not being switched on for most of the time, the LED current in MBR mode is boosted to about 360% of the LED current in the flicker-free mode (as inferred from luminance measurements, so the actual differences in LED currents might be even higher because of a non-linear relation between LED current and emitted luminance).
The Area setting controls the delay of the strobe with respect to the time when the first pixel line is updated, ranging from 0 (no delay) to 100 (maximum delay). The maximum delay is defined by the strobe ending when the first pixel line (of the next frame) is updated. Note that a long delay does not necessarily mean high input lag. Because what is a long delay for the current screen refresh is actually a short delay for the next screen refresh. This is because a given strobe is not bound to a specific refresh period; a strobe doesn't care, so to speak, whether it "highlights" the current frame or the previous or the next. Moreover, when talking about input lag, the actual input lag value always depends on the pixel line which is used for measuring input lag and how far the pixel state has to have changed before claiming a state change.
FreeSync
In the user manual for the BenQ XL2540, which mostly refers to the ZOWIE's XL monitor series in general, there is a section "Activating VESA standard DisplayPort Adaptive-Sync (XL2540 only)". This section basically refers the reader to AMD's website and mentions that the monitor must be connected via DisplayPort or the HDMI-2 input for Adaptive-Sync to work. Since AMD's FreeSync is based on DisplayPort's Adaptive-Sync, FreeSync should actually work as well. And indeed, it kind of does, not with HDMI though and not really stable either. Testing has been stopped as soon as it became clear that too many factors played a role. And this was even just with AMD's simple windmill demo, which is probably not the most thorough test ever. Most likely, the monitor was planned to support FreeSync, but BenQ might have realized that it is just not ready yet and took FreeSync off the feature list without having cleaned up all the traces.
Overdrive (AMA)
AMA is BenQ's implementation of overdrive and only two AMA modes are provided (besides AMA=off), which are dubbed High and Premium. Premium is just good for getting the response times down to the values advertised by BenQ, nothing one would like to use for real. This leaves only the AMA=High setting which, however, is still too aggressive. A much finer overdrive control is available through the OD GAIN parameter in the factory menu (same as with the BenQ XL2730Z), but this setting is lost after power-cycling the monitor or even by just changing the screen resolution or frame rate.
Which OD GAIN values the AMA settings (High, Premium) translate to, depends on the current refresh rate:
- 60 and 100 Hz: 30h, 37h.
- 120 and 144 Hz: 38h, 3Bh.
- 240 Hz: 42h, 4Ch.
It is neither clear why BenQ does not give the user more control over overdrive, nor what makes BenQ choose such aggressive overdrive values. Which values are best depends, of course, on the optimization criterion. When going by the tests shown below (flicker-free settling performance) and trying to minimize the luminance error for the 2nd and 3rd refresh period after a pixel value change, the optimal overdrive values would be 1Ch for 120 Hz and 30h for 240 Hz.
Subjectively, when looking at a moving pattern of gray patches, one would choose even lower values (10h for 120 Hz and 18h for 240 Hz) but this might just be because, otherwise, the color seams appearing at some edges do really pop out from the otherwise gray-in-gray test pattern. Therefore, such gray-in-gray pattern might not be the best choice for finding optimal overdrive values. Note that both the Contrast setting and the white balance (RGB settings – basically the color-specific contrast settings) have a big impact on these color seams, and reducing the Contrast setting, say to 40%, helps.
Vibrance (saturation)


Although it is not entirely clear what the Vibrance setting exactly does, it is closely related to color saturation. A higher Vibrance setting results in higher color saturation, possibly affecting already saturated colors less than others. Vibrance appears to be very useful for counteracting the otherwise mediocre color quality of TN panels. The setting ranges from 0 to 20 and covers, unnecessarily so, a huge saturation range (all the way down to turning the monitor into a B/W monitor), which causes each step to have quite a big effect. The default setting is 10 which seems to be a tiny little bit too low for a neutral setting (very subjectively though). However, 11 is too high already.
Vibrance can also be controlled via DDC/CI, which provides two VCP codes, one with the same resolution of 20 steps as in the OSD (VCP=89h) and one with a higher resolution of 100 steps (VCP=8Ah). However, the higher-resolution setting does not survive power-cycling the monitor or alike, and the DDC/CI implementation details (flaws) make it difficult to even tell whether the monitor is currently using the fine-grained setting or the OSD setting. So this situation is somewhat similar to the situation with overdrive: There are ways of gaining full control over the settings in order to get kind of a preview of what the monitor would be capable of, if the firmware was just a tiny bit more up to it. But in everyday use one is basically stuck with the settings BenQ thinks are best. Luckily, BenQ's default Vibrance setting is pretty good as it is.
In order to quantify the effect of the Vibrance setting, luminance curves for Red, Green, Blue, and White were measured. If everything was perfectly accurate, the luminances of the primary colors would add up like LW=LR+LG+LB(=LRGB for short). However, in case it isn't perfect, the (normalized) error Δe=(LRGB−LW) / LRGB is different from zero (see Figure 1).
A perceptually more relevant measure for checking the impact of theVibrance setting on color accuracy is the deltaE known from standard color accuracy tests. Figure 2 shows the average deltaE for different Vibrance settings, proving that Vibrance=10 is basically at the sweet spot for optimizing deltaE.
Low Blue Light
This is just a commercial gimmick, see Benq XL2411Z.
Flaps
The flaps attached to the left and right side of the bezel are indeed just attached, the feature being here that the flaps can also be left in the box – without actually compromising the design.
Settling behavior
Unless otherwise mentioned, the measurements shown here were taken after having reset the monitor to its factory settings and having changed "Picture mode" to "Standard" and "Contrast" to 40.

The measurements were made with a photo diode PDA36A (Thorlabs), the gain of which was set to 60 dB resulting in a bandwidth of 37.5 kHz and a minimal rise/fall time (10%-90%) of about 9 µs. The photodiode was placed at about 4.5 cm from the screen surface at a straight angle. Ambient light was kept from the measured area by a rubber lens hood of 3 cm diameter which also limited the maximal incident angle to about ±20°.
The vertical extent of the measured screen area was not only limited by the rubber sleeve but also by the stimulus being just a small horizontal stripe covering 5% of the screen height. Note that the LC cells are updated sequentially from the top of the screen to the bottom, which results in different delays for the luminance curves depending on the vertical measurement position. By limiting the measurement to only 5% of the full vertical screen size, the smear effect caused by averaging over differently delayed luminance signals within these 5% becomes close to irrelevant. For example, at a refresh frequency of 120 Hz the screen is updated within around 8 ms, so if the true luminance would change instantly, the measured rise time would be 5%·8 ms = 0.4 ms, which is negligible here.
For more detailed information on the measurement method and the presentation of the results, see Flicker-free settling and LightBoost settling.
Settling curves
Figure 3 shows the luminance signals over time for the horizontal stripe being switched between gray levels 0%-100%, 25%-75%, and 45%-55% respectively. Note that these percent values refer to pixel values and not to luminance values, so the monitor's respective gamma setting, here "Gamma 3" (the default), has to be taken into account when interpreting the absolute luminance levels in the plots.
The direct comparison between 120 Hz and 240 Hz refresh rate shows nicely the advantage of a higher refresh rate, be it with or without overdrive (AMA).

The vertical gray lines mark the time when the OpenGL command sequence SwapBuffers();glFinish(); returns control to the PC program, which is about when the 1st line of a frame is sent out to the monitor. Measurements have been taken at the vertical center of the screen.
Matrix measurements
Flicker-free backlight
Besides the results shown in Figure 4 (below), which refer to 120 Hz and AMA=High, the following conditions might also be of interest:
- 120 Hz, AMA=Off: 1st view | 2nd view
- 240 Hz, AMA=High: 1st view | 2nd view
- 240 Hz, AMA=Off: 1st view | 2nd view
- (The views just differ in where the FROM and the TO axes are plotted – bars which are occluded by other bars in one view usually become visible in the other view.)
Regarding the luminance errors for the 1st, 2nd, and 3rd refresh cycles, it is obviously problematic to compare these between 120 and 240 Hz. In general, interpreting these luminance error plots is somewhat difficult as the errors are signed (blue vs. red bars) but the error offset is determined absolutely. This means that positive and negative errors do not necessarily average to zero, so, for example, an overshooting signal would result in more and longer blue bars. Moreover, the start of the refresh cycles is defined arbitrarily by when the luminance signal crosses, on average for all the FROM-TO combinations, the 50% mark (i.e., half way between FROM and TO), and not by some point in time which would minimize the luminance error for the 1st refresh. More interesting are therefore the errors for the 2nd and 3rd refresh interval and, possibly, the "Settling time to 10%". Note that it is not necessarily the magnitude of errors which counts most but the homogeneity of errors across all FROM-TO gray step combinations, because differences in errors usually cause color shifts during the pixel settling phase.

For further details on the graphs and the measurement method see Flicker-free settling.
Comparing the settling behavior across the different conditions and choosing the "best" setting is quite difficult. What is "best" is often enough – and here quite literally – in the eye of the beholder. And now that 240 Hz has entered the arena, it is getting even more confusing.
So, first 120 Hz (see Figure 5). The "AMA=high,C=50%" condition is only there for reference, as C=50% is the factory setting; "AMA=prem" is only there for showing how bad it is. Then there is "AMA=off", which is actually pretty good as compared to "AMA=high", at least regarding the settling times and luminance errors for the 2nd and 3rd refresh. On the other hand, it is pretty bad in terms of luminance error for the 1st refresh interval, for "Delay deviation", and for "Rise/fall time". The latter is not so much of a surprise and in part always goes hand in hand with "Delay deviation". The high luminance error for the 1st refresh is basically just a consequence of the sluggish rise/fall times and how this error is defined. Although the high "delay variation" could suggest a tendency towards stronger color shifts when a pixel changes, this seems not to be the case – subjectively though and just going by the appearance of a moving gray patch pattern. Finally there is the "OD=1Ch" condition which, however, is only available through the factory setting and marks the sweet spot when aiming for low luminance errors for the 2nd and 3rd refresh, according to the comparison chart across several OD values at 120 Hz. At least when going by these measurements and the subjective impression of the moving gray pattern, "AMA=off" appears to be the "best" choice.
Next is 240 Hz, for which the picture is similar to the 120 Hz case, except that AMA=high and AMA=off are not so far apart. But again, there would be a better overdrive gain setting (OD=30h, according to this comparison chart across several OD values at 240 Hz). As mentionned earlier, comparison between 120 and 240 Hz is difficult, but it nevertheless appears evident that faster is better.
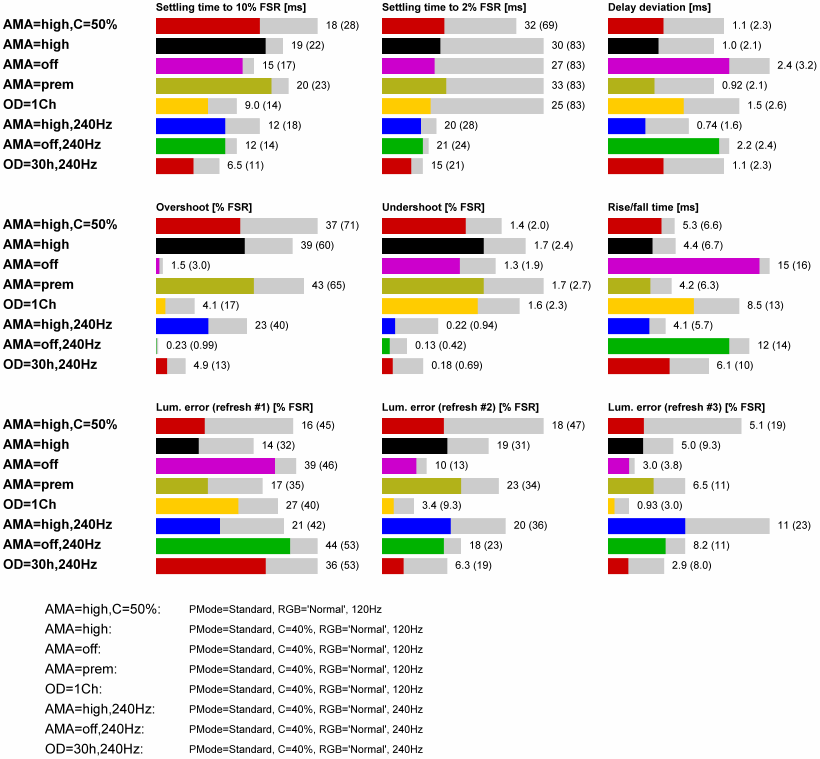
The OD-cases refer to AMA levels which are only accessible through the factory menu (parameter OD-GAIN).
For further details on the measurement method see Flicker-free settling.
Strobed backlight
– to come — maybe (as it is not an official feature) –
