BenQ XL2730Z: Difference between revisions
mNo edit summary |
(No difference)
|
Revision as of 08:37, 7 September 2022
Specifications
| Brand: | BenQ |
|---|---|
| Model: | XL2730Z |
| Size: | 27" |
| Resolution: | 2560x1440 |
| Panel type: | TN |
| Max. refresh rate: | 144 Hz |
| Panel: | AUO M270DTN01.0 |
| Processor: | REALTEK 2769B |
| Backlight type: | LED (white, edge) |
| LED driver: | QIS98AGN (O2 Micro) |
| Price (approx.): | USD 510 |
| Monitor release date: | 2015-04 |
Reviews
BenQ XL2730Z review on PC monitors.
BenQ XL2730Z review on TFT central.
Comparison with other LCDs
Among the monitors tested at display-corner, the BenQ XL2730Z compares probably best to the BenQ XL2411T. Sure, the XL2730Z has a larger screen, a higher pixel resolution, and FreeSync, but other than that...
The positive: This monitor shows an improved image quality, which is partly because the LC panel offers true 8-bit per channel color resolution. Apparently, this panel also exhibits smaller pixel inversion artifacts than the panels used in the XL2411T/Z monitors (and the ASUS VG248QE). Moreover, the REALTEK scaler used in the BenQ XL2730Z comes with an improved color processing that allows for controlling color saturation which makes colors look less washed out than on other gaming TN monitors. Via DDC/CI commands, even a full 6-axes à 2 parameters per axis color control is available.
The negative: The AG coating makes the screen look annoyingly splotchy, although there is no regular cross-hatching pattern visible. The implementation of Motion Blur Reduction (MBR) is still halfhearted, as with all the other BenQ monitors except that, with the XL2730Z, MBR is screwed up and worthless at 100 Hz refresh rate. Moreover, MBR cannot be improved by tweaking the video signal timing (VT tweak). The situation is even made worse by BenQ's choice of a too aggressive overdrive (whether or not MBR is enabled) and not giving the user more control over the strength of overdrive. Again, this is the same as with all the other BenQ gaming monitors.
In conclusion, it is somehow sad to see such nice hardware being sold short just because of poor firmware implementation. And it is becoming quite annoying how BenQ does not do anything about it.
Good to know
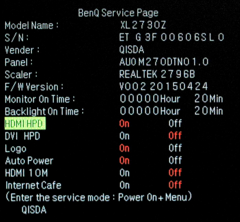
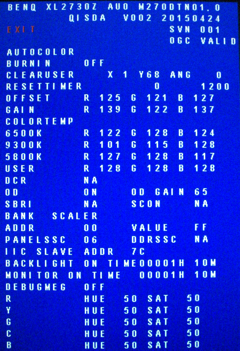
Have the monitor connected to a valid signal source. The service menu can be entered by keeping the 4th button from the top pushed while powering on the monitor. The 4th button can then also be used for toggling the service menu on and off. In order to access the normal OSD menu, first make the service menu disappear and then push any other except the 4th button so that the OSD icons appear (right beside the buttons). Then you can push the 4th button to enter the OSD menu. To go back to normal, power-cycle the monitor.
The factory menu can be brought up by keeping the 3rd and 4th button pushed while powering on the monitor. The 5th button can then be used for toggling the factory menu on and off. To go back to normal, power-cycle the monitor. While in the factory mode, the monitor does not respond to MCCS VCP commands sent over the DDC control interface.
Firmware
The firmware in this monitor cannot be updated as easily anymore as it used to be with previous BenQ gaming monitors. This is because of the different scaler being used in this monitor (REALTEK instead of MSTAR). Even with the older BenQ gaming monitors it was a hassle to get the firmware updated without sending the monitor in. But given that the firmware becomes more and more the bottleneck and that updating is technically possible even without additional hardware, it is about time that manufacturers provide the users with tools so they can easily do the update themselves - which has become common standard for other devices by now for long.
HDMI range
When using the HDMI input, the BenQ expects the color value range received from the PC to be reduced ("RGB(16~235)"). If the PC uses the full color range instead (which is normally the case), then HDMI range should be set to "RGB(0..255)", because otherwise dark and bright colors will be crushed.
Features
Motion Blur Reduction (MBR)
Motion Blur Reduction (MBR for short) is BenQ's alternative to 2D LightBoost and NVIDIA's Ultra Low Motion Blur (ULMB) which comes with G-SYNC monitors (although ULMB can only be enabled while G-SYNC is disabled).
Like LightBoost, MBR pulses the backlight once per refresh interval (or is supposed to do so). In contrast to LightBoost and ULMB, however, MBR neither uses a special LC panel update timing nor does it adapt overdrive parameters according to the vertical pixel position; this makes MBR potentially inferior to Lightboost and ULMB.
On the other hand, Lightboost is a 3D technology and has to play well together with shutter glasses. Therefore, Lightboost underlies more constraints regarding parameters like color balance, refresh frequency, and backlight pulse timing; especially the pulse timing might not be optimal for the 2D application of LightBoost. At least in principle, MBR can be used with any refresh frequency as long as the frequency is fixed, which is not the case in FreeSync mode. So FreeSync and MBR cannot be used at the same time. Unfortunately, the MBR implementation in the BenQ XL2730Z monitor is flawed. Although MBR works fine at 144 Hz and 120 Hz, it is completely out of sync at 100 Hz and uses two pulses per refresh cycle at 60 Hz. The latter might have been implemented on purpose though in order to counteract the strong visual susceptibility to flicker at such low frequencies.
The MBR pulse timing can be set in the OSD menu (which was not the case with the older BenQ monitors capable of MBR). The according parameters become available as soon as MBR is switched on in the OSD menu and are named Intensity and Area. Intensity controls the pulse width in 25 steps, with step 1 referring to the highest and step 25 referring to the lowest intensity – this is BenQ logic. At 120 Hz, the Intensity range corresponds to pulse widths between 2.1 ms and 0.1 ms. Area controls the time of the MBR pulse onset after the update of the screen has started. A value of 0 makes the pulse start when the update starts, a value of 100 makes the pulse end when the (next) update starts. Both settings, Intensity and Area are at 10 by default.
MBR can also be activated and customized through the DDC control interface (VCP code 4Dh: Blur reduction on/off, 4Fh: Intensity, 4Eh: Area).
Note that Area=100 might suggest a long delay, hence, a high input lag. But what seems to be a long delay for the current screen refresh is actually a short delay for the next screen refresh. A certain pulse is not bound to a certain refresh; a pulse doesn't care, so to speak, whether it "sees" the current frame or the previous. Moreover, when talking about input lag, it always depends on the pixel line which is used to measure input lag and how far the pixel state has to have changed before claiming a state change.
While the Intensity setting controls the width of the MBR light pulse, the Brightness setting (in the Picture menu) controls the height of the MBR light pulse, i.e., the momentary brightness of the LEDs while being switched on. This momentary luminance, which corresponds in first approximation to the LED current, is about 240% of the steady-state luminance (i.e., the luminance when MBR is switched off).
Monitor timing (tweaking it)
In order to give the pixels more time to settle before the LED backlight is pulsed (in MBR mode), the screen should be updated as fast as possible, and be left alone for the rest of the refresh interval. With other BenQ gaming monitors it was possible to achieve this by tweaking the video signal timing in order to maximize the line frequency by stretching the duration of the vertical synchronization phase. Although also the BenQ XL2730Z accepts video signals with an extended vertical synchronization phase, it does not respond to it in the intended way. The only effect of a longer vertical synchronization phase is a higher response lag.
Overdrive (AMA)
AMA is BenQ's implementation of overdrive and although apparently nothing has changed regarding the AMA settings as compared to other BenQ monitors, the implementation under the hood has changed – not to the better though. There are only two "AMA on" modes, which are High and Premium. Premium is just good for getting the response times down to the values advertised by BenQ, nothing one would like to use for real. This leaves only the AMA=High setting which, however, is still too aggressive, no matter whether being used with or without MBR. At least it doesn't matter anymore in which order AMA and MBR are set up (as it does with the BenQ XL2411Z, for example).
This is even the more surprising as the factory menu provides a very fine-grained overdrive setting (parameter OD GAIN). AMA=High corresponds to OD=65h, AMA=Premium to OD=A5h (MBR=Off) or OD=75h (MBR=On). Unfortunately, any changes made in the factory menu regarding OD GAIN are only temporary and don't survive power-cycling the monitor or rebooting the connected PC or even just changing the refresh rate.
Vibrance (saturation)
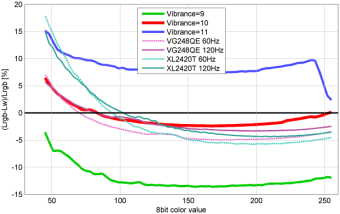
Although it is not entirely clear what the Vibrance setting is doing exactly, it is closely related to color saturation. A higher Vibrance setting causes higher color saturation, possibly affecting already saturated colors less than others. The setting appears to be very useful for counteracting the otherwise poor color quality of TN panels. The setting ranges from 0 to 20 and covers, unnecessarily so, a huge saturation range (all the way down to turning the monitor into a B/W monitor), which causes each step to have quite a big effect. The default setting is 10 which seems to be a tiny bit too low (very subjectively though). However, 11 is too high already, so the optimal setting would be something in between. What is optimal here is a matter of preference, of course.
Interestingly, when controlling these settings remotely via DDC/CI commands, the VCP code 89h addresses the Vibrance setting with the same low resolution as in the OSD menu (i.e., 20 steps), but the official VCP code for Saturation, 8Ah, apparently does the same as Vibrance but with a much higher resolution (100 steps instead of 20). Even more control over color processing is made available by providing a set of 6-by-2 parameters (6 for saturation and 6 for hue) for a 6-axis color calibration, but these parameters are only accessible via DDC/CI not via the OSD menu.
In order to actually quantify the effect of the Vibrance setting, luminance curves for Red, Green, Blue, and White were measured. If everything was perfectly accurate, the luminances would add up like LW=LR+LG+LB(=LRGB for short). But it isn't perfect, so the (normalized) error Δe=(LRGB−LW) / LRGB is not zero.
Obviously, this is not really the right way of checking color accuracy, but given the measurement equipment at hand, it was the easiest and quickest way of getting some measurements regarding the effects of the Vibrance setting.
Low Blue Light
This commercial gimmick is nothing worth thinking about. See Benq XL2411Z.
Settling behavior
There are two backlight operating modes of interest regarding settling behavior: Flicker-free and Motion Blur Reduction (MBR for short). For both modes it is advantageous to set AMA=High. Unlike with some of the older BenQ models (possibly also depending on firmware version), the order in which to set AMA and MBR does not matter.
Unless otherwise mentioned, the measurements shown here were taken after having reset the monitor (via the monitor's OSD menu) and having set "Picture mode" to "Standard". The monitor was operated at 120 Hz refresh frequency. The pulse durations in the strobed backlight modes were set so as to result in a maximal average luminance (i.e., for white) of about 100 cd/m2 (Intensity=13, which is pw=1.1 ms). The pulse phase was left at the default (Area=10), which appears to provide a good balance of settling errors at the top and the bottom of the screen.
The measurements have been taken with a photo diode PDA36A (Thorlabs), the gain of which was set to 60 dB which results in a bandwidth of 37.5 kHz and a minimal rise/fall time (10%-90%) of about 9 µs. The photodiode was placed at about 4.5 cm from the screen surface at a straight angle. Ambient light was kept from the measurement by a rubber lens hood of 3 cm diameter which also limited the maximal incident angle to about ±20°.
The vertical extent of the measured screen area was not only limited by the rubber sleeve but also by the stimulus being just a small horizontal stripe covering 5% of the screen height. Note that the LC cells are updated sequentially from the top of the screen to the bottom, which results in different delays for the luminance curves depending on the vertical measurement position. By limiting the measurement to only 5% of the full vertical screen size, the smear effect caused by averaging over differently delayed luminance signals becomes close to irrelevant. For example, at a refresh frequency of 120 Hz the screen is updated within around 8 ms, so if the true luminance would change instantly, the measured rise time would be 5%·8 ms = 0.4 ms, which is negligible here.
For more detailed information on the measurement method and the presentation of the results, see Flicker-free settling and LightBoost settling.
Settling curves
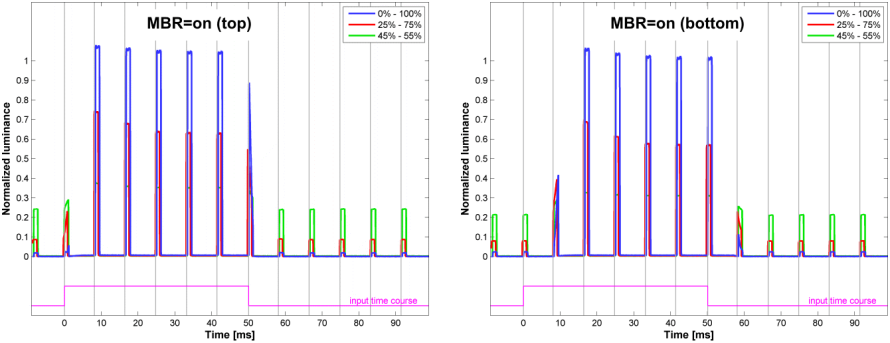
Figure 1 and Figure 2 show the luminance signals for the horizontal stripe being switched between gray levels 0%-100%, 25%-75%, and 45%-55% respectively. Note that these percent values refer to pixel values and not to luminance values, so the monitor's respective gamma setting has to be taken into account when interpreting the absolute luminance levels in the plots.
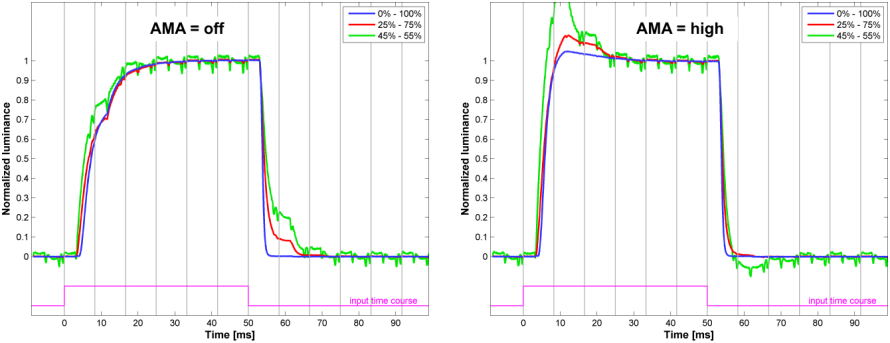
The vertical gray lines mark the time when the OpenGL command sequence SwapBuffers();glFinish(); returns control to the program, which is about when the 1st line of a frame is sent out to the monitor. Measurements have been taken at the vertical center of the screen.
Matrix measurements
Flicker-free backlight


The OD-cases refer to AMA levels which are only accessible through the factory menu (parameter OD-GAIN). AMA=High corresponds to OD=65h.
For further details on the measurement method see Flicker-free settling.
Strobed backlight

For further details on the measurement method and presentation see LightBoost settling.
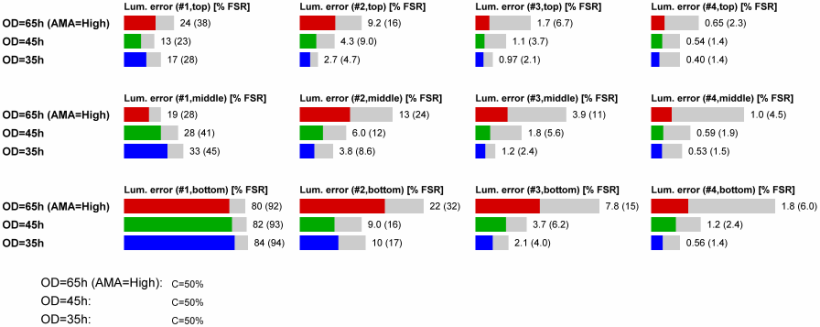
The OD-cases refer to measurements that have been taken after having set OD-GAIN in the factory menu to the respective values. AMA=High corresponds to OD=65h.
For further details on the measurement method see LightBoost settling.
Color spectra
Monitor tear-down
| Wire color | Signal |
|---|---|
| white | LED current control (Brightness B=100: 0 V, B=0: 2.7 V). Changes slightly with MBR. |
| green | LED driver enable (high-active, 3.3 V) |
| black (4x) | GND |
| red (4x) | 12 V (power supply) |
| brown | LED on/off (high-active 3.3 V). Pulsed when MBR=on. |
| yellow | LED current boost (low-active, 3.3 V). This is 3.3 V in standby and when MBR=off, it is 0 V when MBR=on. |
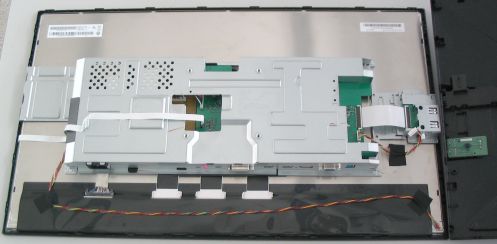
There are two main PCBs, the power supply and LED driver PCB and the controller PCB. Another PCB, the panel controller, is directly connected to the panel. The power supply delivers 12 V to the controller board which generates 3.3 V and 5 V locally. All supplies are available even if the monitor is in standby mode.
The controller EEPROM is a 25Q16DV (winbond), which is a high-speed quad SPI type, so not so easy to hack.
The LED driver is a QIS98AGN (O2 Micro); there are actually two of those.
Hooking up to the control buttons: The control buttons 1, 4,and 5 share one signal, the buttons 2 and 4 another. Only the power button has its own signal. The signals are pulled up to 3.3 V by ≈35 kΩ. Buttons 1 and 3 pull down the signal to ground by 10 kΩ each (when pressed), buttons 2 and 4 by 91 kΩ each, button 5 by 33 kΩ, and the power button directly (0 Ω). So it is relatively easy to hook up an Arduino in order to remotely control these buttons, including the power button. However, programmed button presses and releases have to be timed generously (up to 100 ms each) in order to make the monitor controller detect these events reliably. Enabling the factory menu and changing the OD GAIN value from say 65h to 45h would take around 15 s. It can be made faster though if it does not have to work reliably every time.
